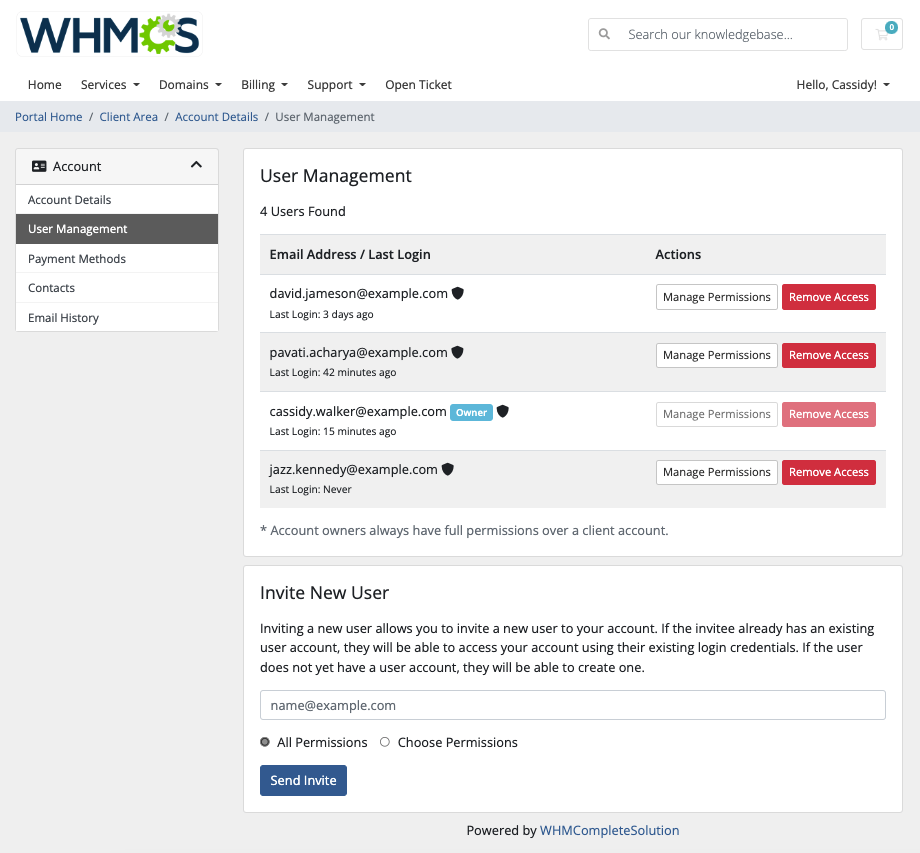
If you wish to allow other people in your organisation to access your account, open support tickets etc, you need to add them to your account as either a user or a contact.
For security reasons, we will generally only accept support requests from authorised users or contacts.
This is rpotect our clients and their services.
If we did not take this approach, then any random person would be able to contact us about your account, make changes, cancel services, transfer domains etc.
What Is An Account?
Accounts own products and services. They represent a billable party, like a business.
What Is A User?
Users have one or more associated accounts that they can access and manage. When a new account is created, a new user is created based on the account profile. This new user then becomes the account owner (see below). Separate controls manage users' access to each account.
A user has the ability to login and access your account, settings, invoices, products/services etc. Permissions are defined by the account holder.
You may invite additional users to your account as required, see below.
What Is An Account Owner?
Each account is associated with a single account owner. Account owners have all of the possible permissions that a user can possess. They are also the only user who can send invitations from the account to new or existing users.
During checkout, users can choose to create a new account for the items in the cart. In this case, the system will assign account ownership for the new account to that user.
What is a Contact
A contact is someone who does not have any login or access to your account, but you can set them to receive certain emails, such as invoices, reminders, tickets etc and given them permission to open support tickets on your account.
A common use for contacts is to add your bookkeeper/accountant to receive copies of invoices or to give certain staff/employees or freelancers the ability to open tickets without giving them account access.
Inviting new users
Account owners can send invitations from the User Management section of the Client Area.
To do this:
- Go to Hello, Name! > User Management.
- Enter an email address under Invite New User.
- Choose All Permissions to grant all available permissions, or select Choose Permissions and select the desired permissions.
- Click Send Invite.
We recommend this method for inviting users to existing accounts.
Managing Accounts and Users in the Client Area
Account owners can manage users and their permissions from the User Management section of the Client Area. We recommend this method for inviting users to existing accounts.
To do this:
- Go to Hello, Name! > User Management.
- Find the desired user in the list.
- Click Manage Permissions.
- Select the desired permissions.
- Click Save Changes.
Note
Account owners cannot edit their own permissions.


